Embedded security learning project and demonstration

Tamper-response firmware and enclosure for the RP2350 M33

Two learning projects: Tamper-response firmware in Rust and in Zephyr RTOS with C for the Raspberry Pi Pico 2, wrapped in a CI/CD pipeline that scans every commit for insecure code and vulnerable dependencies before it can merge. Two sides of secure embedded work, built out end to end. Custom case with magnet-activated reed switch for tamper detection.
Skills used: SAST · SBOM · SCA · secret scanning · Ghidra reverse engineering · 3D printing · soldering · Zephyr RTOS Bare-metal Rust → Zephyr RTOS w/ C → Real CI runs →
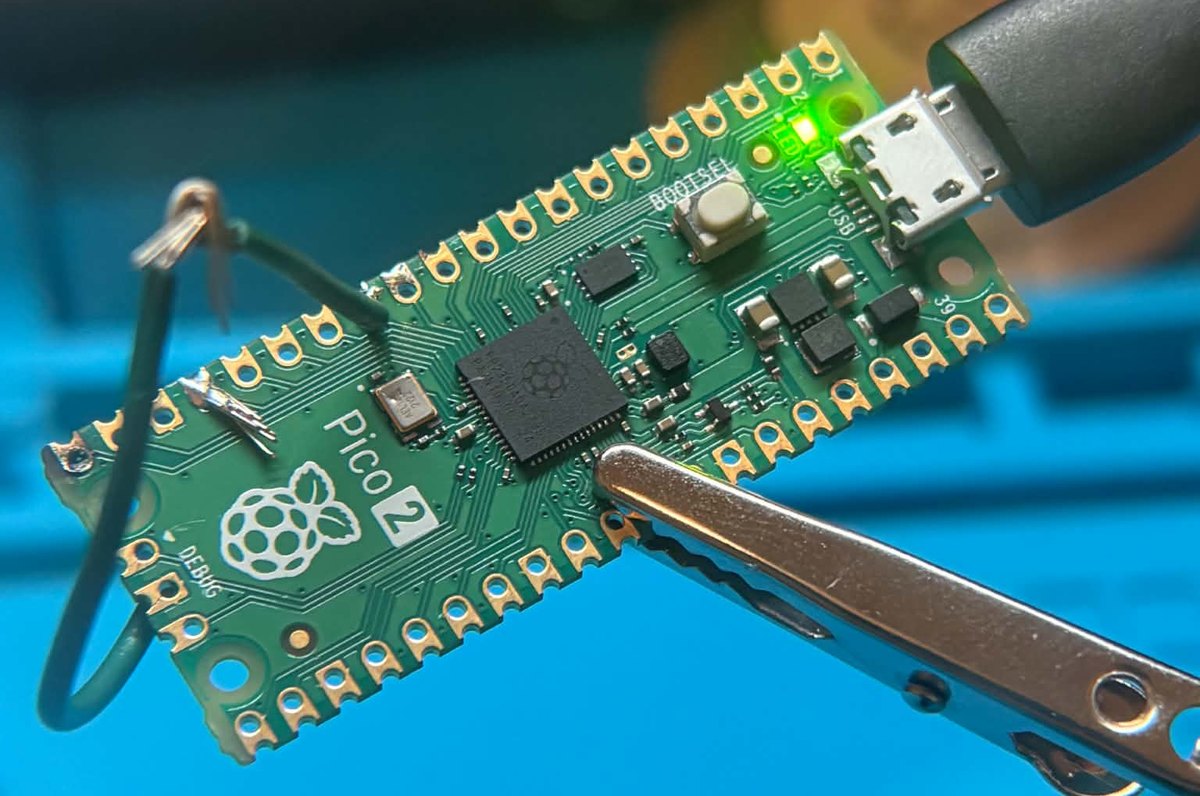
Raspberry Pi Pico 2 with a soldered jumper and alligator clip, onboard LED glowing green, showing the tamper-response firmware armed.
Now running on real hardware. That green LED means the secret is intact. Interrupt the circuit and it zeroizes.
This is a simulation. The buttons below animate a representative run of the real pipeline so you can see how the security gates behave, including how they fail the build when a vulnerability shows up. The actual pipeline runs on GitHub Actions on every push. See the real runs here.
Toggle this on to add a crate with a known CVE. The scanners catch it and block the build.

The firmware it protects · tamper response

The pipeline above guards the code. The firmware holds a secret and zeroizes it the moment the enclosure is opened. Detect, respond, zeroize. Open the lid and watch the secret get wiped!

Sealed
Armed
Secret in memory (32 bytes) intact
Armed. Pin held LOW by the closed lid.
The zeroize routine (Rust)
// A plain `secret = [0; 32]` can be optimized away by the compiler
// (dead-store elimination), so the wipe silently never happens.
// write_volatile forces the memory to actually be overwritten.
fn zeroize_secret(secret: &mut [u8; 32]) {
    for byte in secret.iter_mut() {
        unsafe { write_volatile(byte, 0u8); }
    }
}

What each gate does

BuildCross-compiles the firmware for the RP2350 (thumbv8m). Baseline: does it compile in a clean environment?
Clippy · SASTStatic analysis of the source itself for insecure and incorrect patterns. Findings fail the build.
Syft · SBOMGenerates a standards-format software bill of materials. It's the inventory the vulnerability scanners check against.
Grype · SCAScans every dependency against CVE databases. High/critical findings block the merge.
Trivy · multiVulnerabilities, exposed secrets, and misconfigurations in one pass. Defense in depth over Grype.
cargo-audit · SCARust-native scan against the RustSec advisory database for crate-specific advisories.

Then I reverse-engineered my own firmware

Signing proves firmware is authentic, but it does not hide anything. So I signed my tamper firmware, opened the signed image in Ghidra, and traced it from the boot vector all the way to my own logic. The goal: confirm at the binary level that the security mitigation I wrote actually survives compilation.
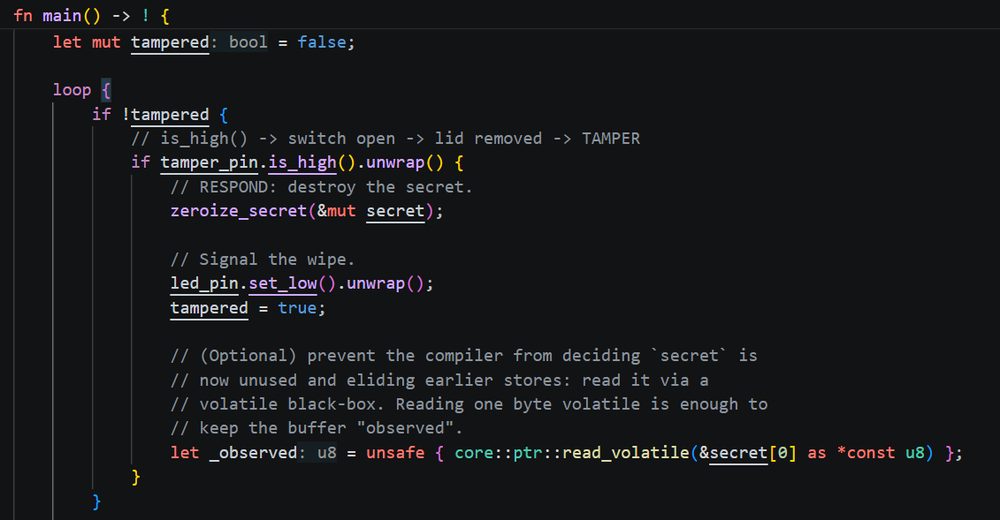
Rust source of the tamper loop: if not tampered and the pin is high, zeroize the secret, set the LED low, and latch the tampered flag.
What I wrote. The tamper loop in Rust: read the pin, and on tamper, zeroize the 32-byte secret.
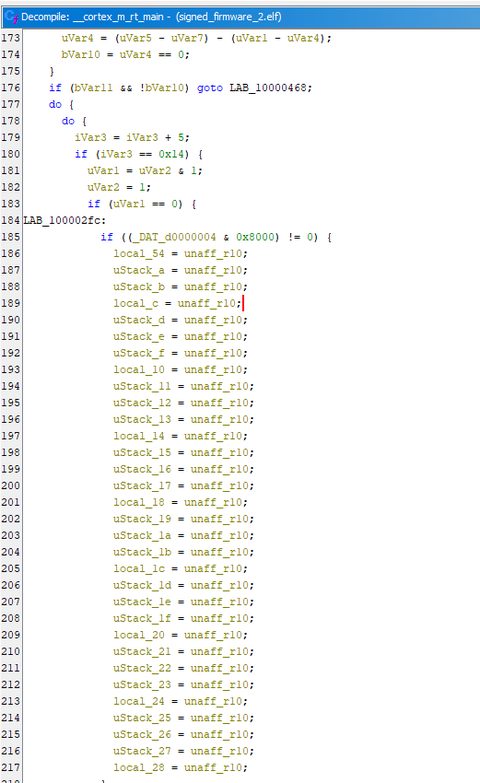
Ghidra decompiler showing a GPIO input register read masked with 0x8000, followed by 32 separate byte assignments of zero to the secret buffer.
What the compiler produced. Ghidra's decompiler: a GPIO input read, then 32 separate writes of zero.
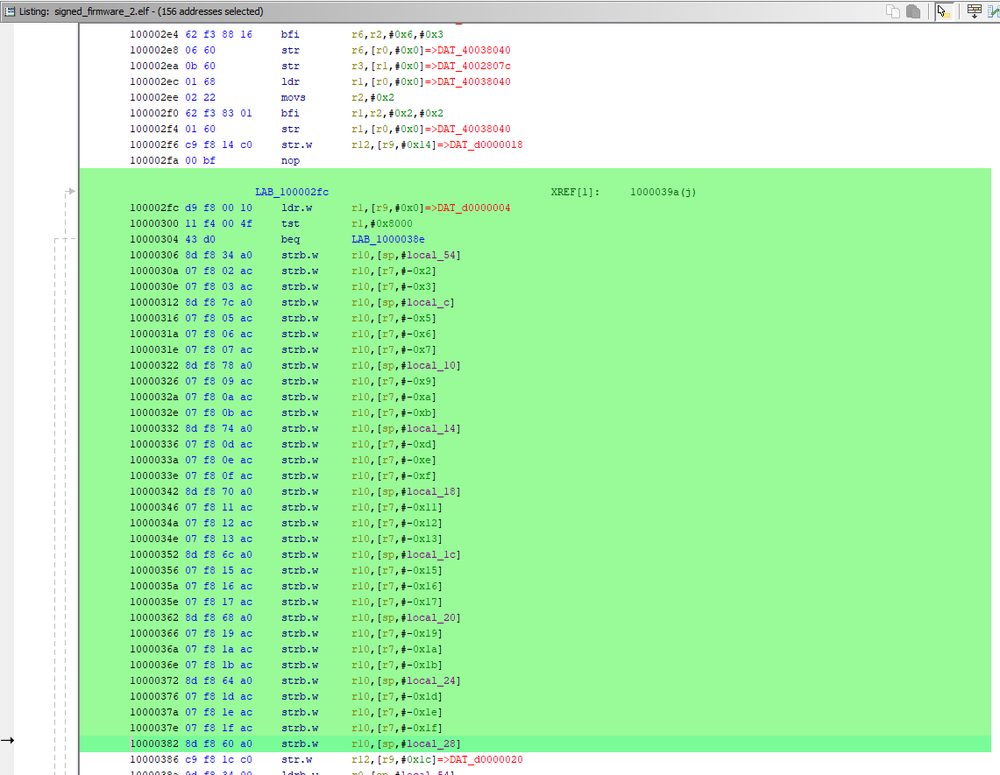
Ghidra assembly listing: a load from GPIO input register 0xd0000004, a test against 0x8000, a branch, then a long run of strb.w r10 store instructions writing zero to each byte of the secret.
Down to the instructions. The disassembly: ldr reads the GPIO input register (0xd0000004), tst checks the tamper pin's bit, and then a wall of strb.w r10 stores writes zero into all 32 bytes of the secret, one at a time.
This is the proof the mitigation works. A naive secret = [0; 32] can be deleted by the compiler as a dead store, so the wipe silently never happens. Because I used the zeroize crate, the compiler was forced to emit all 32 volatile stores. You can see every one of them in the shipped binary. The wipe is real, not optimized away. That is the difference between claiming a security control and verifying one.
Signed is not hiddenI read the entire signed image in the clear. Signing protects integrity, not confidentiality. Encryption is the separate mechanism for that.
Optimization flattens structureMy tidy source got inlined and rearranged. You find logic by behavior and constants, not by labels.
Cortex-M is Thumb-onlyDecoding as ARM produced garbage. Selecting the Cortex/Thumb language was the fix, a real ARM RE gotcha.
Verify, don't assumeSeeing the 32 un-optimized stores turned "I wrote a wipe" into "the wipe provably happens on the device."

Then I rebuilt it on an RTOS, in C

The first version was bare-metal Rust with one loop doing everything. To learn how production embedded systems are actually built, I rewrote the whole tamper device on Zephyr RTOS in C. Same behavior, but now as three independent threads scheduled by a real-time kernel, with the hardware described in a devicetree and a live diagnostic shell. Defense embedded work runs on C and mainstream RTOSes, so this was the higher-value way to build it.

Three concurrent threadsA tamper-monitor thread (high priority), a heartbeat LED thread (low priority), and main, all scheduled by the Zephyr kernel instead of one superloop.
Thread synchronizationThe tamper and heartbeat threads share one atomic flag. The monitor publishes "tampered"; the LED thread reacts, going from a calm blink to a frantic one.
Devicetree hardware descriptionThe reed-switch input is declared in a devicetree overlay, not hardcoded, the portable way Zephyr separates hardware from application code.
Custom diagnostic shellA tamper command over USB serial reports armed/tampered state and dumps the secret bytes, so the wipe can be proven live on the running device.
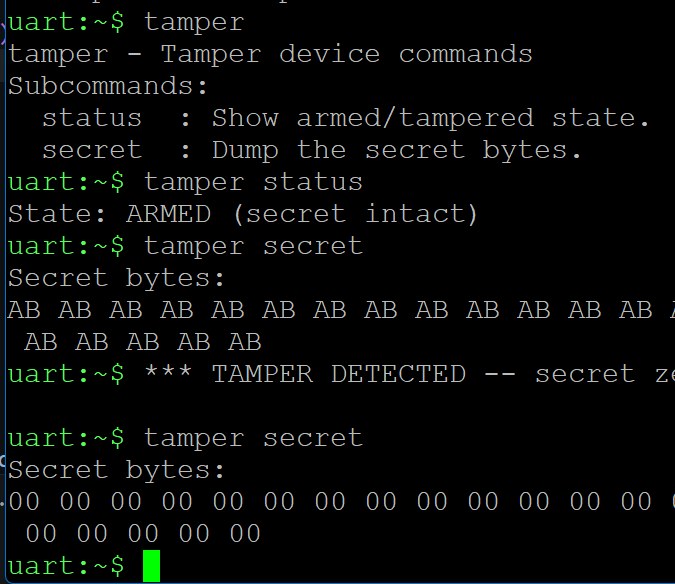
Serial shell session: tamper status shows ARMED, tamper secret shows 32 bytes of AB, then after a tamper event the secret dumps as all 00.
The wipe, proven live. Over the shell: read the secret (AB AB AB…), pull the magnet, read again (00 00 00…). The same result I verified statically in Ghidra, now confirmed interactively on the running device.

Then I gave it a body

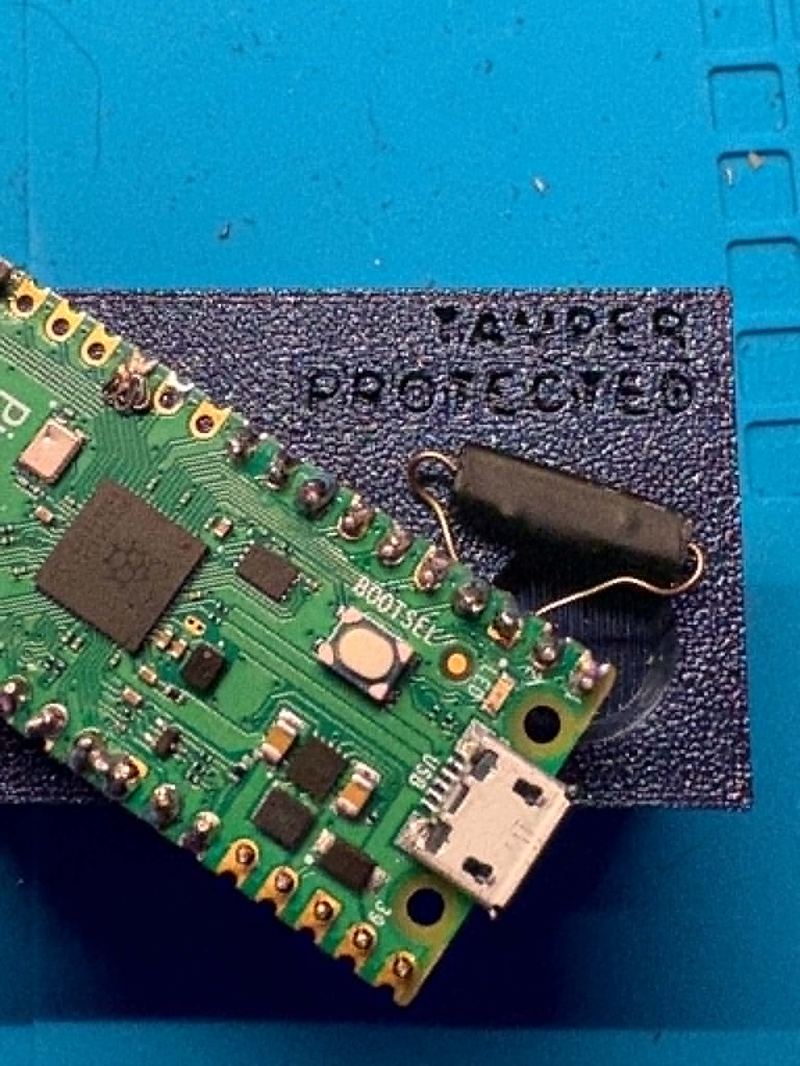
A tamper sensor is only real if opening the box triggers it. I designed an enclosure from scratch in FreeCAD and printed it. A magnet sits in the lid, directly over a reed switch soldered to the board. With the lid on, the magnet holds the switch closed and the device is armed. Lift the lid and the magnet moves away, the switch opens, and the firmware zeroizes the secret. The tamper response is now a physical act.
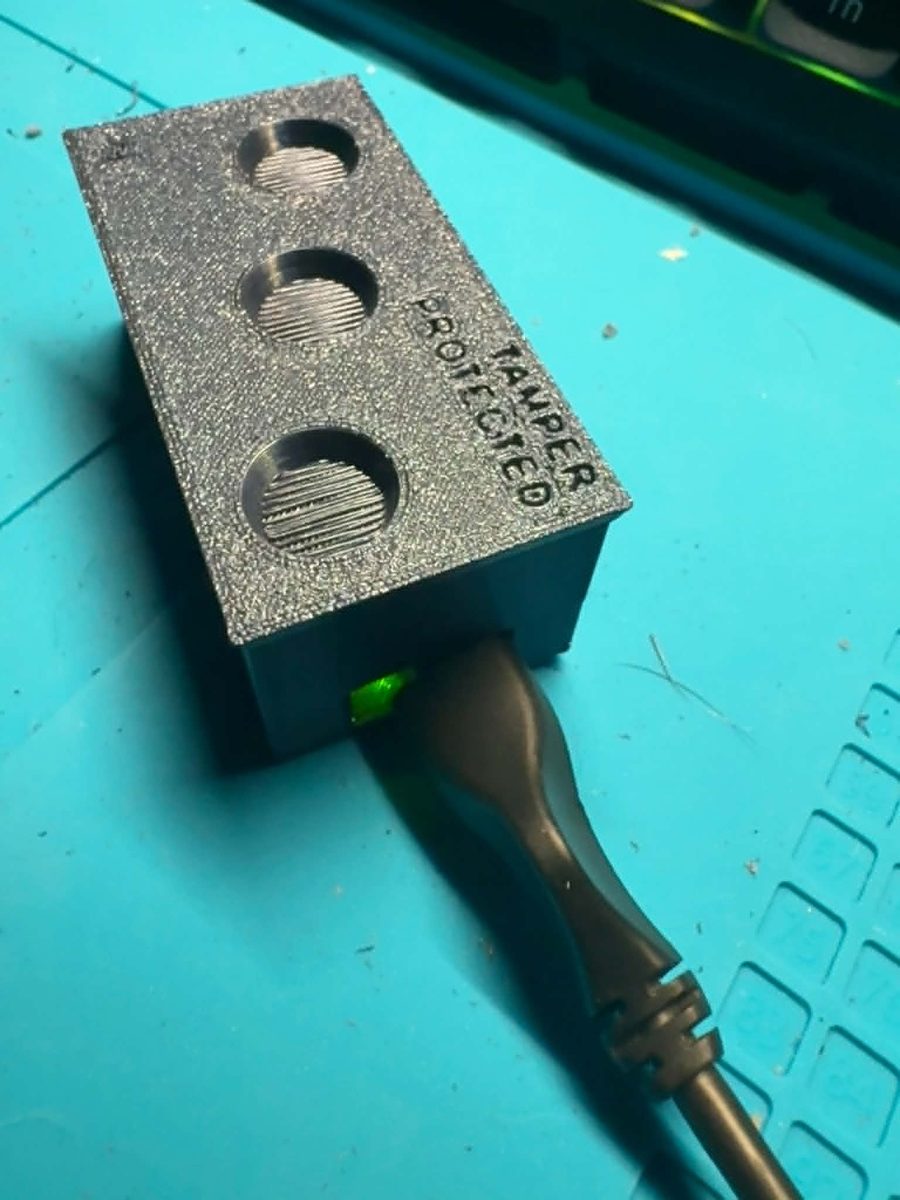
3D-printed enclosure, lid on, with TAMPER PROTECTED embossed on top and three recesses holding lid magnets. A green power LED glows at the seam.
Lid on: armed. The magnet in the lid holds the reed switch closed. Embossed on top, in case anyone was wondering.
The enclosure open, showing the Raspberry Pi Pico 2 inside with a reed switch soldered directly to its pads.
Lid off: wiped. The reed switch, soldered straight to the board, sits under where the lid magnet lands. Remove the lid and the secret is gone.
Two firmwares, one device, from silicon to enclosure. The same tamper-response system, built two ways: bare-metal Rust for full control of the metal, and multi-threaded Zephyr/C for the way real embedded systems are structured. Signed firmware, verified at the binary level, detecting a physical intrusion, wiping a secret, in a case I designed and printed. That is the whole stack, end to end.
mr. pickles
Mr. Pickles My supervisor ensuring quality work